

Turn on and Use File History to Backup and Restore files in Windows 11/10
One should always try to create backups because y'all don't know what may come up towards you lot in the future. In this Windows 11 and Windows 10, one can easily create a backup of File History, but for that, you have to turn on and use File History to backup and restore files in Windows 11/10, and in this article, nosotros are going to help you to do that.

For your information, starting with Windows Vista, Microsoft introduced a feature chosen Shadow Copy or Previous Versions. This allowed users to restore before versions of their files using the Backup and Restore feature. Microsoft has introduced a feature called File History. File History in Windows 11/10/viii saves copies of your Libraries, Desktop, Favorites, and Contacts, so that you can get them back any time if they are ever lost or damaged. While Arrangement Restore allows you to completely restore your computer to an earlier land, File History lets you restore your files and data from an earlier point in time.
How does File History fill-in work?
File History backup creates a mirror image of your organization, as it stores all the bachelor files on an external drive. The bulldoze can exist continued over USB or a dwelling house network. Because of this, you lot can restore that information someday yous desire. So, you don't have to worry about your files anymore, but create a fill-in, and you will exist adept to go.
Turn on & Utilize File History to Backup and Restore files in Windows eleven/10

1 can hands turn on and utilise File History to back upwardly & restore files in Windows 11/ten. Information technology allows one to exist a bit devil-may-care with their files, as you can create a backup and restore it whenever you want. In this post, nosotros are going to go in-depth and see how to utilize this utility in Windows 11/10.
This is a two-stride process, kickoff, y'all have to gear up File History the way you lot desire, and then enable the feature. So, let usa meet how to exercise the aforementioned.
To turn on and apply File History backup in Windows eleven/10, you first have to open up File Historypast searching it out of theStart Carte.After doing that, the File Historywindow will open and from in that location yous will have to configure the setting the way you lot want.
Alternatively, yous can too open upFile Historyfrom theControl Panel. Merely open up Control Panel from the Start Menu. Make sure that yourView byis ready toCategories. ClickOrganisation and Security > File History.
At present, let us see how to prepare File History in Windows eleven/10
- Open Command Panel > File History
- Select the Drive
- Exclude folders yous don't want to back up
- Decide if you want to Save copies of files and Keep saved versions
- Turn On File History Backup
You lot are all prepare!
1] Open File History Control Panel applet
Using Search, Open up Control Panel > File History.
2] Select Bulldoze

Commencement upward, we need to select a bulldoze where your File History should be stored. To do that, click Select drive. At present, select a drive, and click Ok. If you are non able to observe a network drive in the list, but clickShow all network locations, and clickAdd network locationto add a drive.
You may be asked to confirm your activeness, so, clickAyewhen needed.
3] Exclude folders

If you don't want a binder to be included in theFile History fill-in,simply clickExclude folders. At present, you can add or remove a folder, by clicking on their respective buttons, and and then click Save Changes.
4] Avant-garde settings
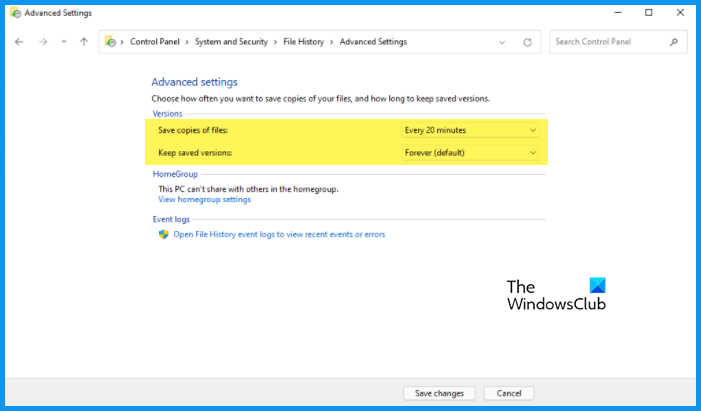
If you want to practice a few more things, and then Advanced Settingsis where you need to get. Here you tin select how often you want your calculator to take a backup. So, utilize the driblet-down menu to change Save copies of filesandGo on saved versions. Finally, clickSaved changes.
five] Plow On File History Backup in Windows 11/10

Finally, you tin can enable File History backup by just clicking on thePlough onbutton.
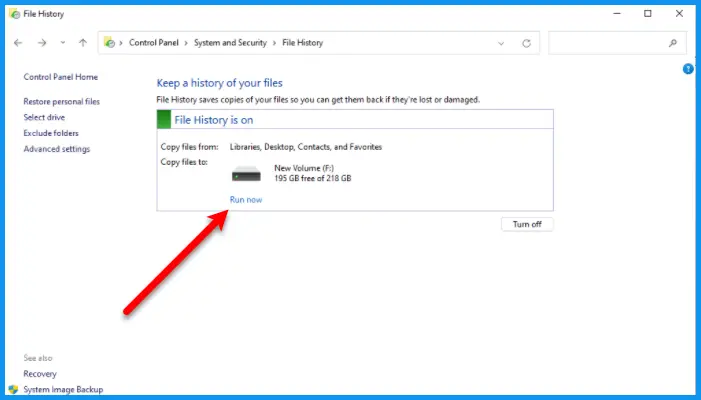
Ordinarily, afterwards clicking the button, your computer will start creating the backup, you can confirm this by checking if in that location is aStoppush button. If there is noStopbutton, there must beRun now.Click that button and y'all volition be good to become.
Now, you lot can close the File History window.
Plough off or Pause File History in Windows 11/ten
If you don't desire to backup your content, temporarily or permanently, you lot can turn off or pause File History. To pause File History for a while, you can click on theFinishpush and then resume it, click onRun at presentand you will be good to go. Whereas, to disable File History fill-in, you lot have to click on theTurn offbutton.
TIP: You tin can too disable File History Backup in Windows using REGEDIT or GPEDIT.
Restore files using File History in Windows xi/ten
To recover files using File History, follow the given steps.
- Open upFile History.
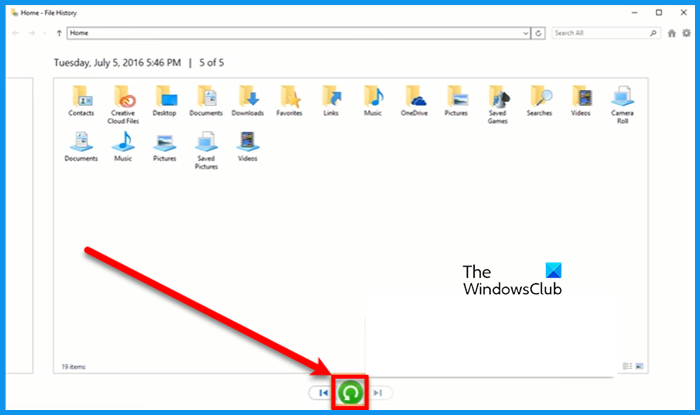
- Click on Restore personal files.
- Click on theDark-greenpush to restore the files at the original location.
- To restore files at a new location, you can correct-click on the same icon and and so clickRestore to.
That's how yous can recover files using File History.
File History Cleanup
If you desire to relieve some space by deleting your File History, you tin do that from theAvant-garde Settings. Just go to File History > Advanced settings > Clean up versions.Now, you can delete an quondam copy of the File History.
File History not working in Windows 11/10
There are many error letters you lot can see related to File History, we have tried to accumulate solutions for all of them. Then, go through the following solutions and execute the i for the error message that y'all are getting.
- Enable File History
- Select a different bulldoze
- Turn on BitLocker
- Decrypt EFS Files
Let u.s. talk about them in item.
1] Enable File History
If y'all are seeing the error message, that says "File History doesn't recognize this device" or"No usable drive found, we recommend that you use an external drive for File History. Connect a bulldoze and refresh this page, or use a network location.", so the first thing yous should do is enable the File History (aforementioned).
2] Select a different drive
If the issue persists, then you should effort changing the drive. To exercise that, open File History, click Select drive, cull a different drive, and click Ok. Finally, encounter if the consequence persists.
3] Turn on Bitlocker
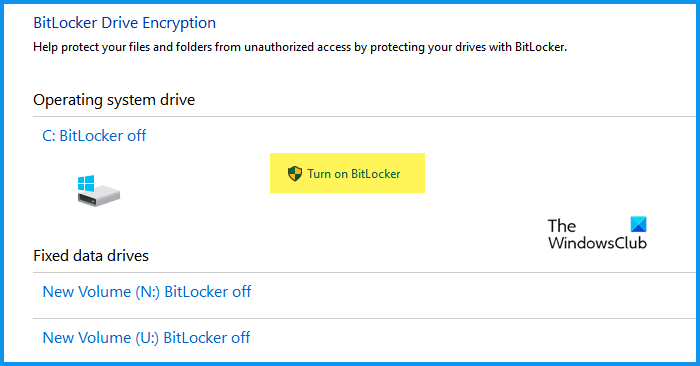
If you are seeing an fault message that says "Your PC is protected by Bitlocker Drive Encryption, only your file History drive is not.", then y'all take to enable Bitlocker.
To enable Bitlocker in Windows 11/10, follow the given steps.
- OpenControl Panelby searching information technology out of theGet-go Card.
- Brand sure that yourView byis prepare toCategories.
- ClickSystem and Security > BitLocker Drive Encryption.
- Now, click onPlow on BitLocker.
Now, come across if the issue persists.
4] Decrypt EFS Files
If you are seeing the following error message, then you demand to decrypt EFS Files or Remove Network Paths
File history has constitute files that are encrypted with Encrypting File Organization, on a network location, or on a drive that doesn't use the NTFS file organisation, these files won't be backed upwardly.
File history can not backup encrypted files, so, if there is such file, yous have to decrypt them, and then try taking the backup.
Follow the given steps to practice the same.
- OpenFile ExplorerbyWin + E.
- Navigate to the folder that you were trying to backup.
- Right-click on it and selectProperties.
- Brand sure y'all are on theGeneraltab and click Advanced.
- Untick the Encrypt contents to secure data option and then clickOK.
Finally, cheque if the result persists.
Read:Fix File History Chemical element Not Institute mistake on Windows.
Where is File History saved?
When setting up theFile History backup,you must have selected a drive where you want to back all the files, that is, your backup drive. So, that's where the File History is saved. You can just go there and retrieve your files. If yous want to alter the location, you can change drive past following the method aforementioned.
Create Backups on Local Drive using File History
As I had mentioned, past default, Windows does non offer any direct way to permit you create backups on your local hard drive. But there is a way out. To practice so, select the drive you want to create the backups on. Allow'due south say you lot have selected D drive. Now right-click on it and select Backdrop. Nether the Sharing tab, click on Advanced Sharing button. In the window which opens, check to Share this folder. Next, give the folder a name. I have given the name as FileHistoryBackup.

Next, click on Permissions. In the folder's Permissions box, check the Allow boxes for Full Control, Modify, and Read. Click Apply/OK.
Now in the Change drive setting, click on Add Network Location and enter the post-obit in the Folder field.
\\127.0.0.1\FileHistoryBackup
Click Select Folder > Save > OK. The backups via File History will at present get saved in your D:\FileHistoryBackup folder.
The Windows operating system includes in-built tools that let you backup and make copies of your files and create a system prototype. It also includes a System Paradigm Backup Tool, with which y'all can now fill-in or clone an image of your disk. But if you wish to utilize a third-political party freeware, then cheque out some of these free Imaging, Backup and Recovery Software.Yous can also use Windows 7 Back up and Restore Tool in Windows xi/ten.
If I take missed out on anything, please practice share in the comments.
Now read: How to Clone a Hard Drive on Windows 11/10.

Source: https://www.thewindowsclub.com/file-history-windows-8
Posted by: cuadradolifeatchas.blogspot.com
0 Response to "Turn on and Use File History to Backup and Restore files in Windows 11/10"
Post a Comment